iOS SDK
The Jitsi Meet iOS SDK provides the same user experience as the Jitsi Meet app, in a customizable way which you can embed in your apps.
iOS 15.1 or higher is required.
Sample applications using the SDK
If you want to see how easy integrating the Jitsi Meet SDK into a native application is, take a look at the sample applications repository.
Usage
There are 2 ways to integrate the SDK into your project:
- Using CocoaPods
- Building it yourself
Using CocoaPods
The recommended way for using the SDK is by using CocoaPods. In order to
do so, add the JitsiMeetSDK dependency to your existing Podfile or create
a new one following this example:
platform :ios, '15.1'

workspace 'JitsiMeetSDKTest.xcworkspace'

target 'JitsiMeetSDKTest' do
  project 'JitsiMeetSDKTest.xcodeproj'

  pod 'JitsiMeetSDK'
end
Replace JitsiMeetSDKTest with your project and target names.
Since the SDK requests camera and microphone access, make sure to include the
required entries for NSCameraUsageDescription and NSMicrophoneUsageDescription
in your Info.plist file.
In order for app to properly work in the background, select the "audio" and "voip" background modes.
Last, since the SDK shows and hides the status bar based on the conference state,
you may want to set UIViewControllerBasedStatusBarAppearance to NO in your
Info.plist file.
Building it yourself
-
Install all required dependencies.
-
Build it:
mkdir -p ios/sdk/out
xcodebuild clean \
    -workspace ios/jitsi-meet.xcworkspace \
    -scheme JitsiMeetSDK
xcodebuild archive \
    -workspace ios/jitsi-meet.xcworkspace \
    -scheme JitsiMeetSDK  \
    -configuration Release \
    -sdk iphonesimulator \
    -destination='generic/platform=iOS Simulator' \
    -archivePath ios/sdk/out/ios-simulator \
    SKIP_INSTALL=NO \
    BUILD_LIBRARY_FOR_DISTRIBUTION=YES
xcodebuild archive \
    -workspace ios/jitsi-meet.xcworkspace \
    -scheme JitsiMeetSDK  \
    -configuration Release \
    -sdk iphoneos \
    -destination='generic/platform=iOS' \
    -archivePath ios/sdk/out/ios-device \
    SKIP_INSTALL=NO \
    BUILD_LIBRARY_FOR_DISTRIBUTION=YES
xcodebuild -create-xcframework \
    -framework ios/sdk/out/ios-device.xcarchive/Products/Library/Frameworks/JitsiMeetSDK.framework \
    -framework ios/sdk/out/ios-simulator.xcarchive/Products/Library/Frameworks/JitsiMeetSDK.framework \
    -output ios/sdk/out/JitsiMeetSDK.xcframework
cp -a ios/Pods/hermes-engine/destroot/Library/Frameworks/universal/hermes.xcframework ios/sdk/out
After successfully building Jitsi Meet SDK for iOS, the resulting XCFramework(s) will be in the ios/sdk/out directory.
If you are embedding the Framework directly into your project you'll also need to add the generated hermes.xcframework.
NOTE: Your app will need to depend on the JitsiWebRTC CocoaPod.
API
JitsiMeet is an iOS framework which embodies the whole Jitsi Meet experience and makes it reusable by third-party apps.
To get started:
-
Add a
JitsiMeetViewto your app using a Storyboard or Interface Builder, for example. -
Then, once the view has loaded, set the delegate in your controller and load the desired URL:
- (void)viewDidLoad {
  [super viewDidLoad];

  JitsiMeetView *jitsiMeetView = (JitsiMeetView *) self.view;
  jitsiMeetView.delegate = self;

  JitsiMeetConferenceOptions *options = [JitsiMeetConferenceOptions fromBuilder:^(JitsiMeetConferenceOptionsBuilder *builder) {
      builder.serverURL = [NSURL URLWithString:@"https://meet.jit.si"];
      builder.room = @"test123";
      builder.audioOnly = YES;
  }];

  [jitsiMeetView join:options];
}
JitsiMeetView class
The JitsiMeetView class is the entry point to the SDK. It a subclass of
UIView which renders a full conference in the designated area.
delegate
Property to get/set the JitsiMeetViewDelegate on JitsiMeetView.
join:JitsiMeetConferenceOptions
Joins the conference specified by the given options.
  JitsiMeetConferenceOptions *options = [JitsiMeetConferenceOptions fromBuilder:^(JitsiMeetConferenceOptionsBuilder *builder) {
      builder.serverURL = [NSURL URLWithString:@"https://meet.jit.si"];
      builder.room = @"test123testing";
      builder.audioOnly = NO;
      builder.audioMuted = NO;
      builder.videoMuted = NO;
      builder.welcomePageEnabled = NO;
     [builder setConfigOverride:@"requireDisplayName" withBoolean:YES];
     [builder setConfigOverride:@"customToolbarButtons" withArray:@[
        @{
            @"icon": @"ICON_URL",
            @"id": @"CUSTOM_BTN_ID"
        },
        @{
            @"icon": @"ICON_URL",
            @"id": @"CUSTOM_BTN_ID"
        },
        @{
            @"icon": @"ICON_URL",
            @"id": @"CUSTOM_BTN_ID"
        },
        @{
            @"icon": @"ICON_URL",
            @"id": @"CUSTOM_BTN_ID"
        },
        @{
            @"backgroundColor": @"CUSTOM_BTN_BACKGROUND_COLOR",
            @"icon": @"ICON_URL",
            @"id": @"CUSTOM_BTN_ID"
        }
     ]];
        <!-- If you want your custom button/s to appear inside the toolbar,
        you will need to set your toolbar buttons too and always include "overflowmenu", "hangup".
        All the buttons that, because of the screen size, won't fit the toolbar, will be automatically moved to the overflow menu. -->
     [builder setConfigOverride:@"toolbarButtons" withArray:@[@"CUSTOM_BTN_ID", @"CUSTOM_BTN_ID", @"CUSTOM_BTN_ID", @"CUSTOM_BTN_ID", @"CUSTOM_BTN_ID", @"overflowmenu", @"hangup"]];
  }];

  [jitsiMeetView join:options];
leave
Leaves the currently active conference.
hangUp
The localParticipant leaves the current conference.
setAudioMuted
Sets the state of the localParticipant audio muted according to the muted parameter.
setVideoMuted
Sets the state of the localParticipant video muted according to the muted parameter.
sendEndpointTextMessage
Sends a message via the data channel to one particular participant or to all of them.
If the to param is empty, the message will be sent to all the participants in the conference.
In order to get the participantId, the PARTICIPANT_JOINED event should be listened for,
which data includes the id and this should be stored somehow.
toggleScreenShare
Sets the state of the localParticipant screen sharing according to the enabled parameter.
openChat
Opens the chat dialog. If to contains a valid participantId, the private chat with that particular participant will be opened.
sendChatMessage
Sends a chat message via to one particular participant or to all of them.
If the to param is empty, the message will be sent to all the participants in the conference.
In order to get the participantId, the PARTICIPANT_JOINED event should be listened for,
which data includes the id and this should be stored somehow.
closeChat
Closes the chat dialog.
retrieveParticipantsInfo
Retrieves the participants information in the completionHandler sent as parameter.
Universal / deep linking
In order to support Universal / deep linking, JitsiMeet offers 2 class
methods that you app's delegate should call in order for the app to follow those
links.
If these functions return NO it means the URL wasn't handled by the SDK. This is useful when the host application uses other SDKs which also use linking.
-  (BOOL)application:(UIApplication *)application
continueUserActivity:(NSUserActivity *)userActivity
  restorationHandler:(void (^)(NSArray *restorableObjects))restorationHandler
{
  return [[JitsiMeet sharedInstance] application:application
               continueUserActivity:userActivity
                 restorationHandler:restorationHandler];
}
And also one of the following:
// See https://developer.apple.com/documentation/uikit/uiapplicationdelegate/1623073-application?language=objc
- (BOOL)application:(UIApplication *)app
            openURL:(NSURL *)url
            options:(NSDictionary<UIApplicationOpenURLOptionsKey,id> *)options {
  return [[JitsiMeet sharedInstance] application:app
                            openURL:url
                            options: options];
}
JitsiMeetViewDelegate
This delegate is optional, and can be set on the JitsiMeetView instance using
the delegate property.
It provides information about the conference state: was it joined, left, did it fail?
All methods in this delegate are optional.
conferenceJoined
Called when a conference was joined. data contains the following information:
url: the conference URL
conferenceTerminated
Called when the active conference ends, be it because of user choice or because of a failure. data contains the
following information:
url: the conference URLerror: missing if the conference finished gracefully, otherwise contains the error message
conferenceWillJoin
Called before a conference is joined. data contains the following information:
url: the conference URL
enterPictureInPicture
Called when entering Picture-in-Picture is requested by the user. The app should
now activate its Picture-in-Picture implementation (and resize the associated
JitsiMeetView. The latter will automatically detect its new size and adjust
its user interface to a variant appropriate for the small size ordinarily
associated with Picture-in-Picture.)
The data dictionary is empty.
participantJoined
Called when a participant has joined the conference. data contains the following information:
email: the email of the participant. It may not be set if the remote participant didn't set one.name: the name of the participant.role: the role of the participant.participantId: the id of the participant.
participantLeft
Called when a participant has left the conference. data contains the following information:
participantId: the id of the participant that left.
audioMutedChanged
Called when the local participant's audio is muted or unmuted. data contains the following information:
muted: a boolean indicating whether the audio is muted or not.
videoMutedChanged
Called when the local participant's video is muted or unmuted. data contains the following information:
muted: an integer indicating whether the video is muted or not. 0 means unmuted, 4 means muted.
endpointTextMessageReceived
Called when an endpoint text message is received.
The data dictionary contains a senderId key with the participantId of the sender and a message key with the
content.
screenShareToggled
Called when a participant starts or stops sharing his screen.
The data dictionary contains a participantId key with the id of the participant and a 'sharing' key with boolean
value.
chatMessageReceived
Called when a chat text message is received. data contains the following information:
senderId: the id of the participant that sent the message.message: the content of the message.isPrivate: true if the message is private, false otherwise.timestamp: the (optional) timestamp of the message.
chatToggled
Called when the chat dialog is opened or closed. data contains the following information:
isOpen: true if the chat dialog is open, false otherwise.
readyToClose
Called when the SDK is ready to be closed. No meeting is happening at this point.
customButtonPressed
Called when custom buttons are added to the overflow menu. data contains the following information:
id: the id of the pressed custom button.text: the label of the pressed custom button.
conferenceUniqueIdSet
Called when a meeting unique id was set. data contains the following information:
sessionId: the unique conference id.
recordingStatusChanged
Called when current recording status is changing. data contains the following information:
erroridinitiatorliveStreamViewURLmodestatusterminatortimestamp
Picture-in-Picture
JitsiMeetView will automatically adjust its UI when presented in a
Picture-in-Picture style scenario, in a rectangle too small to accommodate its
"full" UI.
Jitsi Meet SDK does not currently implement native Picture-in-Picture on iOS. If
desired, apps need to implement non-native Picture-in-Picture themselves and
resize JitsiMeetView.
If delegate implements enterPictureInPicture:, the in-call toolbar will
render a button to afford the user to request entering Picture-in-Picture.
Dropbox integration
To setup the Dropbox integration, follow these steps:
- Add the following to the app's Info.plist and change
<APP_KEY>to your Dropbox app key:
<key>CFBundleURLTypes</key>
<array>
  <dict>
    <key>CFBundleURLName</key>
    <string></string>
    <key>CFBundleURLSchemes</key>
    <array>
      <string>db-<APP_KEY></string>
    </array>
  </dict>
</array>
<key>LSApplicationQueriesSchemes</key>
<array>
  <string>dbapi-2</string>
  <string>dbapi-8-emm</string>
</array>
- Make sure your app calls the Jitsi Meet SDK universal / deep linking delegate methods.
Screen Sharing integration
The screen sharing functionality for iOS was added to Jitsi starting with JitsiMeetSDK version 3.3.0. It is available for applications running on iOS 14 or newer.
For achieving this we are using the Broadcast Upload Extension for capturing the contents of the user's screen. Passing the frames to the RN WebRTC is done using Unix stream-oriented sockets communication, the extension acting as the client and the React Native WebRTC being the server.
The following documentation covers the code provided in the sample app.
Creating the Broadcast Upload Extension
The Broadcast Upload Extension is one of the App Extensions types defined in iOS and is used for capturing the contents of the user's screen.
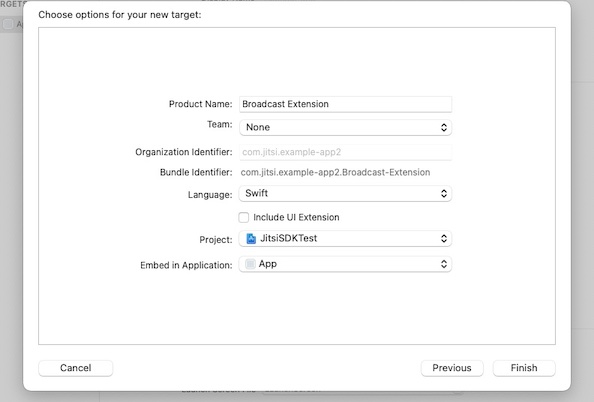
For creating the extension you need to add a new target to your application, selecting the Broadcast Upload Extension template. Fill in the desired name, change the language to Swift, make sure Include UI Extension is not selected, as we don't need custom UI for our case, then press Finish (screenshot 1). You will see that a new folder with the extension's name was added to the project's tree, containing the SampleHandler.swift class. Also, make sure to update the Deployment Info, for the newly created extension, to iOS 14 or newer. To learn more about creating App Extensions check the official documentation.

With the extension created the next steps are to set up the socket connection, add the functionality for handling the received frames, and send them to RN WebRTC for processing. We will be using the code provided with the sample project for this. Copy SampleUploader.swift, SocketConnection.swift, DarwinNotificationCenter.swift, and Atomic.swift files to your extension's folder and make sure they're added to the target.
Setting up the socket connection
Sending the recorded frames to RN WebRTC is done via Unix SOCK_STREAM sockets. The extension needs to be set up as the client endpoint for this.
We will update SampleHandler.swift to initiate the socket connection with RN WebRTC, using the SocketConnection class. But before, we have to set up the file that the sockets will use for communication.
Even though an app extension bundle is nested within its containing app’s bundle, the running app extension and containing app have no direct access to each other’s containers. We will address this by enabling data sharing. To enable data sharing, use Xcode or the Developer portal to enable app groups for the containing app and its contained app extensions. Next, register the app group in the portal and specify the app group to use in the containing app. To learn about working with app groups, see Adding an App to an App Group.
Now, add a private var socketFilePath: String to your SampleHandler class and set it up with a shared file named rtc_SSFD, using the newly registered app group, like this:
private enum Constants {
    static let appGroupIdentifier = "my.custom.app.group"
}

private var socketFilePath: String {
    let sharedContainer = FileManager.default.containerURL(forSecurityApplicationGroupIdentifier: Constants.appGroupIdentifier)

    return sharedContainer?.appendingPathComponent("rtc_SSFD").path ?? ""
}
Next, we will configure the SocketConnection to use the shared file. Add a private var clientConnection: SocketConnection? to the SampleHandler class and override init to set it up, like this:
override init() {
    super.init()
    if let connection = SocketConnection(filePath: socketFilePath) {
        clientConnection = connection
    }
}
In order for this to work, the RN WebRTC end needs to know about the app group identifier we have configured the app with. We are doing this by adding a new key named RTCAppGroupIdentifier to the app's Info.plist with the app group identifier as the value.
Opening the socket connection
For starting screen sharing JitsiMeet SDK provides the UI to present the RPSystemBroadcastPickerView to the user. By default, the picker will display a list of all the available broadcast providers. In order to limit the picker to our particular broadcast provider, we have to set preferredExtension to the bundle identifier of the broadcast extension. We are doing this by adding a new key named RTCScreenSharingExtension to the app's Info.plist and setting the broadcast extension bundle identifier as the value.
Once screen recording has started ReplayKit invokes the methods to handle video buffers, as well as the methods to handle starting and stopping the broadcast, from the SampleHandler class. The broadcastStarted(withSetupInfo:) method is our entry point for opening the socket connection with the RN WebRTC server. To do this we have to post the broadcastStarted notification the server is listening for, in order to start the connection, and we are ready to connect. Add a new method openConnection() to the SampleHandler class which will repeatedly attempt connecting to the server, for cases when the server connection start is delayed:
func openConnection() {
    let queue = DispatchQueue(label: "broadcast.connectTimer")
    let timer = DispatchSource.makeTimerSource(queue: queue)
    timer.schedule(deadline: .now(), repeating: .milliseconds(100), leeway: .milliseconds(500))
    timer.setEventHandler { [weak self] in
        guard self?.clientConnection?.open() == true else {
            return
        }

        timer.cancel()
    }

    timer.resume()
}
Next, update the broadcastStarted(withSetupInfo:) method to post the notification and connect:
override func broadcastStarted(withSetupInfo setupInfo: [String: NSObject]?) {
    DarwinNotificationCenter.shared.postNotification(.broadcastStarted)
    openConnection()
}
DarwinNotificationCenter is a simple helper class for broadcasting system-wide notifications, instead of delivering only within a single program, as NSNotificationCenter does. This mechanism allows the app to register for notifications sent from the extension.
Now we are ready to start sending video frames.
Sending video frames
RN WebRTC is designed to work with jpeg encoded images framed in a CFHTTPMessage object. The following header fields are required:
Content-Length- the size of the jpeg dataBuffer-Width- the width of the buffer, in pixelsBuffer-Height- the buffer height, in pixelsBuffer-Orientation- the value for theRPVideoSampleOrientationKeythat describes the video orientation.
We are going to prepare and send our video frames using the SampleUploader class. Add a new private var uploader: SampleUploader? to the SampleHandler class and update init() to initialize it:
override init() {
    super.init()
    if let connection = SocketConnection(filePath: socketFilePath) {
      clientConnection = connection
      uploader = SampleUploader(connection: connection)
    }
}
Next, we are going to update the processSampleBuffer(_ sampleBuffer: CMSampleBuffer, with sampleBufferType: RPSampleBufferType) method to send our video frames. For performance reasons, we'll also implement a very simple mechanism for adjusting the frame rate by using every third frame. Add a new private var frameCount = 0 and update the above-mentioned method like this:
override func processSampleBuffer(_ sampleBuffer: CMSampleBuffer, with sampleBufferType: RPSampleBufferType) {
    switch sampleBufferType {
    case .video:
        // very simple mechanism for adjusting frame rate by using every third frame
        frameCount += 1
        if frameCount % 3 == 0 {
            uploader?.send(sample: sampleBuffer)
        }
    default:
        break
    }
}
Also, update broadcastStarted(withSetupInfo setupInfo: [String: NSObject]?) to reset the frameCount every time screen sharing is started:
override func broadcastStarted(withSetupInfo setupInfo: [String: NSObject]?) {
    frameCount = 0

    DarwinNotificationCenter.shared.postNotification(.broadcastStarted)
    openConnection()
}
With this, we've concluded sending the video frames and we can move to the last step, handling stop screen sharing.
Handling stop screen sharing
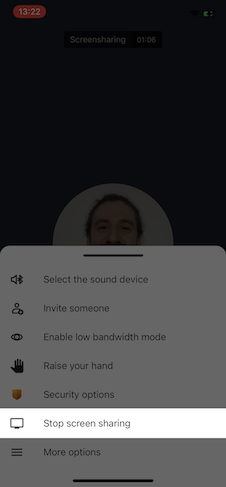
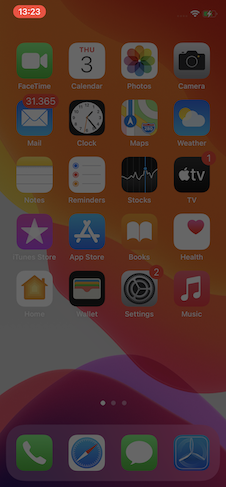
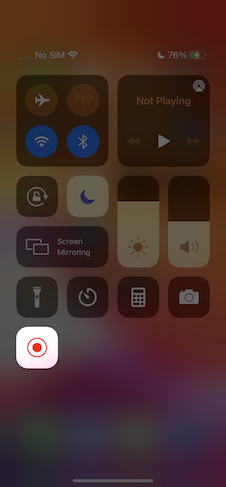
Besides the in-meeting UI (screenshot 2), ReplayKit integration with iOS provides support for stopping screen recording outside of the app's control, from the status bar (screenshot 3) or using the Control Center (screenshot 4).


Any of these actions will trigger broadcastFinished in our SampleHandler implementation. This is our entry point for closing the connection and cleaning up. We will update broadcastFinished to post a DarwinNotification.broadcastStopped system-wide notification and close the connection:
override func broadcastFinished() {
    DarwinNotificationCenter.shared.postNotification(.broadcastStopped)
    clientConnection?.close()
}
Another scenario we need to take care of is when the server connection is dropped, like when leaving a meeting while screen sharing or an error is encountered. We will address this by handling clientConnection.didClose event. Add a new method setupConnection to the SampleHandler class and update init to call it:
func setupConnection() {
    clientConnection?.didClose = { [weak self] error in
        if let error = error {
            self?.finishBroadcastWithError(error)
        } else {
            // the displayed failure message is more user friendly when using NSError instead of Error
            let JMScreenSharingStopped = 10001
            let customError = NSError(domain: RPRecordingErrorDomain, code: JMScreenSharingStopped, userInfo: [NSLocalizedDescriptionKey: "Screen sharing stopped"])
            self?.finishBroadcastWithError(customError)
        }
    }
}

override init() {
    super.init()
    if let connection = SocketConnection(filePath: socketFilePath) {
      clientConnection = connection
      setupConnection()

      uploader = SampleUploader(connection: connection)
    }
}
Now, that we are done writing the implementation, we just need to enable the functionality in Jitsi. We are doing this by configuring JitsiMeetConferenceOptionsBuilder with the ios.screensharing.enabled feature flag, like this:
let options = JitsiMeetConferenceOptions.fromBuilder { [weak self] builder in
    ...
    builder.setFeatureFlag("ios.screensharing.enabled", withBoolean: true)
}
meetView.join(options)
Finally, we are ready to test the implementation. Before doing so, make sure voip is added to UIBackgroundModes, in the app's Info.playlist, in order to work when the app is in the background.
TL;DR
- Add a
Broadcast Upload Extension, without UI, to your app. Update deployment info to run in iOS 14 or newer. - Copy
SampleUploader.swift,SocketConnection.swift,DarwinNotificationCenter.swiftandAtomic.swiftfiles from the sample project to your extension. Make sure they are added to the extension's target. - Add both the app and the extension to the same App Group. Next, add the app group id value to the app's
Info.plistfor theRTCAppGroupIdentifierkey. - Add a new key
RTCScreenSharingExtensionto the app'sInfo.plistwith the extension'sBundle Identifieras the value. - Update
SampleHandler.swiftwith the code from the sample project. UpdateappGroupIdentifierconstant with the App Group name your app and extension are both registered to. - Update
JitsiMeetConferenceOptionsto enable screen sharing using theios.screensharing.enabledfeature flag. - Make sure
voipis added toUIBackgroundModes, in the app'sInfo.plist, in order to work when the app is in the background.
Debugging
-
If you choose
Consoleapp for debugging, please be sure that you select:Action(tab) ->Include Info MessagesAction(tab) ->Include Debug Messages -
In the Search filter please type
JitsiMeetSDK, press Return key and replaceANYwithCategory. This will show you all the real time logs related to our SDK.