Self-Hosting Guide - Docker
Quick start
In order to quickly run Jitsi Meet on a machine running Docker and Docker Compose, follow these steps:
-
Download and extract the latest release. DO NOT clone the git repository. See below if you are interested in running test images:
wget $(wget -q -O - https://api.github.com/repos/jitsi/docker-jitsi-meet/releases/latest | grep zip | cut -d\" -f4) -
Unzip the package, and enter the new folder:
unzip <filename>
cd <foldername> -
Create a
.envfile by copying and adjustingenv.example:cp env.example .env -
Set strong passwords in the security section options of
.envfile by running the following bash script./gen-passwords.sh -
Create required
CONFIGdirectories- For linux:
mkdir -p ~/.jitsi-meet-cfg/{web,transcripts,prosody/config,prosody/prosody-plugins-custom,jicofo,jvb,jigasi,jibri}- For Windows:
echo web,transcripts,prosody/config,prosody/prosody-plugins-custom,jicofo,jvb,jigasi,jibrimkdir "~/.jitsi-meet-cfg/$_" -
Run
docker compose up -d -
Access the web UI at
https://localhost:8443(or a different port, in case you edited the.envfile).
HTTP (not HTTPS) is also available (on port 8000, by default), but that's e.g. for a reverse proxy setup; direct access via HTTP instead HTTPS leads to WebRTC errors such as Failed to access your microphone/camera: Cannot use microphone/camera for an unknown reason. Cannot read property 'getUserMedia' of undefined or navigator.mediaDevices is undefined.
IMPORTANT: When deploying Jitsi Meet for real use you must set the PUBLIC_URL env variable to the real domain where your setup is running.
If you want to use jigasi too, first configure your env file with SIP credentials and then run Docker Compose as follows:
docker compose -f docker-compose.yml -f jigasi.yml up
If you want to enable document sharing via Etherpad, configure it and run Docker Compose as follows:
docker compose -f docker-compose.yml -f etherpad.yml up
If you want to enable a virtual collaborative whiteboard via Excalidraw, configure it and run Docker Compose as follows:
docker compose -f docker-compose.yml -f whiteboard.yml up
If you want to use jibri too, first configure a host as described in Jitsi Broadcasting Infrastructure configuration section and then run Docker Compose as follows:
docker compose -f docker-compose.yml -f jibri.yml up -d
or to use jigasi too:
docker compose -f docker-compose.yml -f jigasi.yml -f jibri.yml up -d
To include a transcriber component, run Docker Compose as follows:
docker compose -f docker-compose.yml -f transcriber.yml up -d
Or for them all together:
docker compose -f docker-compose.yml -f transcriber.yml -f jigasi.yml -f jibri.yml up -d
For the log analysis project, you will need both log-analyser.yml and grafana.yml files. This project allows you to analyze docker logs in grafana. If you want to run the log analyzer, run the Docker files as follows:
docker-compose -f docker-compose.yml -f log-analyser.yml -f grafana.yml up -d
Follow this document for detailed information on log analysis.
Updating
If you want to update, simply run
wget $(wget -q -O - https://api.github.com/repos/jitsi/docker-jitsi-meet/releases/latest | grep zip | cut -d\" -f4)
again (just like how you initially downloaded Jitsi). Then unzip and overwrite all when being asked:
unzip <filename>
Testing development / unstable builds
Download the latest code:
git clone https://github.com/jitsi/docker-jitsi-meet && cd docker-jitsi-meet
The code in master is designed to work with the unstable images. Do not run it with release images.
Run docker compose up as usual.
Every day a new "unstable" image build is uploaded.
Building your own images
Download the latest code:
git clone https://github.com/jitsi/docker-jitsi-meet && cd docker-jitsi-meet
The provided Makefile provides a comprehensive way of building the whole stack or individual images.
To build all images:
make
To build a specific image (the web image for example):
make build_web
Once your local build is ready make sure to add JITSI_IMAGE_VERSION=latest to your .env file.
Security note
This setup used to have default passwords for internal accounts used across components. In order to make the default setup secure by default these have been removed and the respective containers won't start without having a password set.
Strong passwords may be generated as follows: ./gen-passwords.sh
This will modify your .env file (a backup is saved in .env.bak) and set strong passwords for each of the
required options. Passwords are generated using openssl rand -hex 16 .
DO NOT reuse any of the passwords.
Architecture
A Jitsi Meet installation can be broken down into the following components:
- A web interface
- An XMPP server
- A conference focus component
- A video router (could be more than one)
- A SIP gateway for audio calls
- A Broadcasting Infrastructure for recording or streaming a conference.
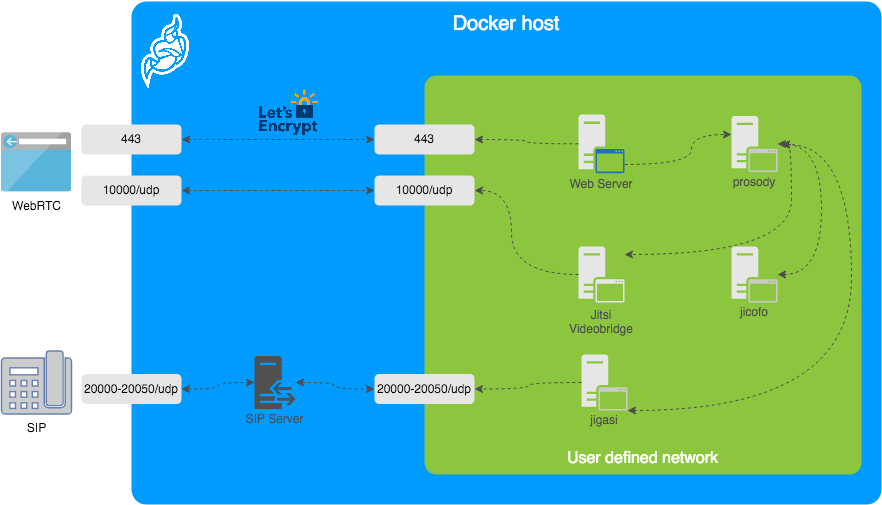
The diagram shows a typical deployment in a host running Docker. This project separates each of the components above into interlinked containers. To this end, several container images are provided.
External Ports
The following external ports must be opened on a firewall:
80/tcpfor Web UI HTTP (really just to redirect, after uncommentingENABLE_HTTP_REDIRECT=1in.env)443/tcpfor Web UI HTTPS10000/udpfor RTP media over UDP
Also 20000-20050/udp for jigasi, in case you choose to deploy that to facilitate SIP access.
E.g. on a CentOS/Fedora server this would be done like this (without SIP access):
sudo firewall-cmd --permanent --add-port=80/tcp
sudo firewall-cmd --permanent --add-port=443/tcp
sudo firewall-cmd --permanent --add-port=10000/udp
sudo firewall-cmd --reload
See the corresponding section in the debian/ubuntu setup guide.
Images
- base: Debian stable base image with the S6 Overlay for process control and the Jitsi repositories enabled. All other images are based on this one.
- base-java: Same as the above, plus Java (OpenJDK).
- web: Jitsi Meet web UI, served with nginx.
- prosody: Prosody, the XMPP server.
- jicofo: Jicofo, the XMPP focus component.
- jvb: Jitsi Videobridge, the video router.
- jigasi: Jigasi, the SIP (audio only) gateway.
- jibri: Jibri, the broadcasting infrastructure.
Design considerations
Jitsi Meet uses XMPP for signaling, thus the need for the XMPP server. The setup provided by these containers does not expose the XMPP server to the outside world. Instead, it's kept completely sealed, and routing of XMPP traffic only happens on a user-defined network.
The XMPP server can be exposed to the outside world, but that's out of the scope of this project.
Configuration
The configuration is performed via environment variables contained in a .env file.
You can copy the provided env.example file as a reference.
| Variable | Description | Example |
|---|---|---|
CONFIG | Directory where all configuration will be stored | /opt/jitsi-meet-cfg |
TZ | System Time Zone | Europe/Amsterdam |
HTTP_PORT | Exposed port for HTTP traffic | 8000 |
HTTPS_PORT | Exposed port for HTTPS traffic | 8443 |
JVB_ADVERTISE_IPS | IP addresses of the Docker host (comma separated), needed for LAN environments | 192.168.1.1 |
PUBLIC_URL | Public URL for the web service | https://meet.example.com |
The mobile apps won't work with self-signed certificates (the default). See below for instructions on how to obtain a proper certificate with Let's Encrypt.
TLS Configuration
Let's Encrypt configuration
If you want to expose your Jitsi Meet instance to the outside traffic directly, but don't own a proper TLS certificate, you are in luck because Let's Encrypt support is built right in. Here are the required options:
| Variable | Description | Example |
|---|---|---|
ENABLE_LETSENCRYPT | Enable Let's Encrypt certificate generation | 1 |
LETSENCRYPT_DOMAIN | Domain for which to generate the certificate | meet.example.com |
LETSENCRYPT_EMAIL | E-Mail for receiving important account notifications (mandatory) | alice@atlanta.net |
In addition, you will need to set HTTP_PORT to 80 and HTTPS_PORT to 443 and PUBLIC_URL to your domain.
You might also consider to redirect HTTP traffic to HTTPS by setting ENABLE_HTTP_REDIRECT=1.
Let's Encrypt rate limit warning: Let's Encrypt has a limit to how many times you can submit a request
for a new certificate for your domain name. At the time of writing, the current limit is five new (duplicate)
certificates for the same domain name every seven days. Because of this, it is recommended that you disable the
Let's Encrypt environment variables from .env if you plan on deleting the .jitsi-meet-cfg folder.
Otherwise, you might want to consider moving the .jitsi-meet-cfg folder to a different location so you have a safe place to find
the certificate that already Let's Encrypt issued. Or do initial testing with Let's Encrypt disabled, then re-enable
Let's Encrypt once you are done testing.
When you move away from LETSENCRYPT_USE_STAGING,
you will have to manually clear the certificates from .jitsi-meet-cfg/web.
For more information on Let's Encrypt's rate limits, visit: https://letsencrypt.org/docs/rate-limits/
Using existing TLS certificate and key
If you own a proper TLS certificate and don't need a Let's Encrypt certificate, you can configure Jitsi Meet container to use it.
Unlike Let's Encrypt certificates, this is not configured through the .envfile, but by telling Jitsi Meet's web service
to mount the following two volumes:
- mount
/path/to/your/cert.keyfile to/config/keys/cert.keymount point - mount
/path/to/your/cert.fullchainfile to the/config/keys/cert.crtmount point.
Doing it in docker-compose.yml file should look like this:
services:
    web:
        ...
        volumes:
            ...
            - /path/to/your/cert.fullchain:/config/keys/cert.crt
            - /path/to/your/cert.key:/config/keys/cert.key
Features configuration (config.js)
| Variable | Description | Example |
|---|---|---|
TOOLBAR_BUTTONS | Configure toolbar buttons. Add the buttons name separated with comma(no spaces between comma) | |
HIDE_PREMEETING_BUTTONS | Hide the buttons at pre-join screen. Add the buttons name separated with comma | |
ENABLE_LOBBY | Control whether the lobby feature should be enabled or not | 1 |
ENABLE_AV_MODERATION | Control whether the A/V moderation should be enabled or not | 1 |
ENABLE_PREJOIN_PAGE | Show a prejoin page before entering a conference | 1 |
ENABLE_WELCOME_PAGE | Enable the welcome page | 1 |
ENABLE_CLOSE_PAGE | Enable the close page | 0 |
DISABLE_AUDIO_LEVELS | Disable measuring of audio levels | 0 |
ENABLE_NOISY_MIC_DETECTION | Enable noisy mic detection | 1 |
ENABLE_BREAKOUT_ROOMS | Enable breakout rooms | 1 |
Jigasi SIP gateway (audio only) configuration
If you want to enable the SIP gateway, these options are required:
| Variable | Description | Example |
|---|---|---|
JIGASI_SIP_URI | SIP URI for incoming / outgoing calls | test@sip2sip.info |
JIGASI_SIP_PASSWORD | Password for the specified SIP account | <unset> |
JIGASI_SIP_SERVER | SIP server (use the SIP account domain if in doubt) | sip2sip.info |
JIGASI_SIP_PORT | SIP server port | 5060 |
JIGASI_SIP_TRANSPORT | SIP transport | UDP |
Display Dial-In information
| Variable | Description | Example |
|---|---|---|
DIALIN_NUMBERS_URL | URL to the JSON with all Dial-In numbers | https://meet.example.com/dialin.json |
CONFCODE_URL | URL to the API for checking/generating Dial-In codes | https://jitsi-api.jitsi.net/conferenceMapper |
The JSON with the Dial-In numbers should look like this:
{"message":"Dial-In numbers:","numbers":{"DE": ["+49-721-0000-0000"]},"numbersEnabled":true}
Recording / live streaming configuration with Jibri
Details
If you are using a release older than 7439 some extra setup is necessary.
Before running Jibri on releases older than 7439, you need to set up an ALSA loopback device on the host. This will not work on a non-Linux host.For CentOS 7, the module is already compiled with the kernel, so just run:
# configure 5 capture/playback interfaces
echo "options snd-aloop enable=1,1,1,1,1 index=0,1,2,3,4" > /etc/modprobe.d/alsa-loopback.conf
# setup autoload the module
echo "snd_aloop" > /etc/modules-load.d/snd_aloop.conf
# load the module
modprobe snd-aloop
# check that the module is loaded
lsmod | grep snd_aloop
For Ubuntu:
# install the module
apt update && apt install linux-image-extra-virtual
# configure 5 capture/playback interfaces
echo "options snd-aloop enable=1,1,1,1,1 index=0,1,2,3,4" > /etc/modprobe.d/alsa-loopback.conf
# setup autoload the module
echo "snd-aloop" >> /etc/modules
# check that the module is loaded
lsmod | grep snd_aloop
If you are running on AWS you may need to reboot your machine to use the generic kernel instead of the "aws" kernel. If after reboot, your machine is still using the "aws" kernel, you'll need to manually update the grub file. So just run:
# open the grub file in editor
nano /etc/default/grub
# Modify the value of GRUB_DEFAULT from "0" to "1>2"
# Save and exit from file

# Update grub
update-grub
# Reboot the machine
reboot now
For using multiple Jibri instances, you have to select different loopback interfaces for each instance manually.
Default the first instance has:
...
slave.pcm "hw:Loopback,0,0"
...
slave.pcm "hw:Loopback,0,1"
...
slave.pcm "hw:Loopback,1,1"
...
slave.pcm "hw:Loopback,1,0"
...
To setup the second instance, run container with changed /home/jibri/.asoundrc:
...
slave.pcm "hw:Loopback_1,0,0"
...
slave.pcm "hw:Loopback_1,0,1"
...
slave.pcm "hw:Loopback_1,1,1"
...
slave.pcm "hw:Loopback_1,1,0"
...
Also you can use numbering id for set loopback interface. The third instance will have .asoundrc that looks like:
...
slave.pcm "hw:2,0,0"
...
slave.pcm "hw:2,0,1"
...
slave.pcm "hw:2,1,1"
...
slave.pcm "hw:2,1,0"
...
If you want to enable Jibri these options are required:
| Variable | Description | Example |
|---|---|---|
ENABLE_RECORDING | Enable recording / live streaming | 1 |
Extended Jibri configuration:
| Variable | Description | Example |
|---|---|---|
JIBRI_RECORDER_USER | Internal recorder user for Jibri client connections | recorder |
JIBRI_RECORDER_PASSWORD | Internal recorder password for Jibri client connections | <unset> |
JIBRI_RECORDING_DIR | Directory for recordings inside Jibri container | /config/recordings |
JIBRI_FINALIZE_RECORDING_SCRIPT_PATH | The finalizing script. Will run after recording is complete | /config/finalize.sh |
JIBRI_XMPP_USER | Internal user for Jibri client connections. | jibri |
JIBRI_STRIP_DOMAIN_JID | Prefix domain for strip inside Jibri (please see env.example for details) | muc |
JIBRI_BREWERY_MUC | MUC name for the Jibri pool | jibribrewery |
JIBRI_PENDING_TIMEOUT | MUC connection timeout | 90 |
Jitsi Meet configuration
Jitsi-Meet uses two configuration files for changing default settings within
the web interface: config.js and interface_config.js. The files are
located within the CONFIG/web/ directory configured within your environment file.
These files are re-created on every container restart.
If you'd like to provide your own settings, create your own config files:
custom-config.js and custom-interface_config.js.
It's enough to provide your relevant settings only, the docker scripts will append your custom files to the default ones!
Authentication
Authentication can be controlled with the environment variables below. If guest access is enabled, unauthenticated users will need to wait until a user authenticates before they can join a room. If guest access is not enabled, every user will need to authenticate before they can join.
If authentication is enabled, once an authenticated user logged in, it is always
logged in before the session timeout. You can set ENABLE_AUTO_LOGIN=0 to disable
this default auto login feature or you can set JICOFO_AUTH_LIFETIME to limit
the session lifetime.
| Variable | Description | Example |
|---|---|---|
ENABLE_AUTH | Enable authentication | 1 |
ENABLE_GUESTS | Enable guest access | 1 |
AUTH_TYPE | Select authentication type (internal, jwt or ldap) | internal |
ENABLE_AUTO_LOGIN | Enable auto login | 1 |
JICOFO_AUTH_LIFETIME | Select session timeout value for an authenticated user | 3 hours |
Internal authentication
The default authentication mode (internal) uses XMPP credentials to authenticate users.
To enable it you have to enable authentication with ENABLE_AUTH and set AUTH_TYPE to internal,
then configure the settings you can see below.
Internal users must be created with the prosodyctl utility in the prosody container.
In order to do that, first, execute a shell in the corresponding container:
docker compose exec prosody /bin/bash
Once in the container, run the following command to create a user:
prosodyctl --config /config/prosody.cfg.lua register TheDesiredUsername meet.jitsi TheDesiredPassword
Note that the command produces no output.
To delete a user, run the following command in the container:
prosodyctl --config /config/prosody.cfg.lua unregister TheDesiredUsername meet.jitsi
To list all users, run the following command in the container:
find /config/data/meet%2ejitsi/accounts -type f -exec basename {} .dat \;
Authentication using LDAP
You can use LDAP to authenticate users. To enable it you have to enable authentication with ENABLE_AUTH and
set AUTH_TYPE to ldap, then configure the settings you can see below.
| Variable | Description | Example |
|---|---|---|
LDAP_URL | URL for ldap connection | ldaps://ldap.domain.com/ |
LDAP_BASE | LDAP base DN. Can be empty. | DC=example,DC=domain,DC=com |
LDAP_BINDDN | LDAP user DN. Do not specify this parameter for the anonymous bind. | CN=binduser,OU=users,DC=example,DC=domain,DC=com |
LDAP_BINDPW | LDAP user password. Do not specify this parameter for the anonymous bind. | LdapUserPassw0rd |
LDAP_FILTER | LDAP filter. | (sAMAccountName=%u) |
LDAP_AUTH_METHOD | LDAP authentication method. | bind |
LDAP_VERSION | LDAP protocol version | 3 |
LDAP_USE_TLS | Enable LDAP TLS | 1 |
LDAP_TLS_CIPHERS | Set TLS ciphers list to allow | SECURE256:SECURE128 |
LDAP_TLS_CHECK_PEER | Require and verify LDAP server certificate | 1 |
LDAP_TLS_CACERT_FILE | Path to CA cert file. Used when server certificate verification is enabled | /etc/ssl/certs/ca-certificates.crt |
LDAP_TLS_CACERT_DIR | Path to CA certs directory. Used when server certificate verification is enabled. | /etc/ssl/certs |
LDAP_START_TLS | Enable START_TLS, requires LDAPv3, URL must be ldap:// not ldaps:// | 0 |
Authentication using JWT tokens
You can use JWT tokens to authenticate users. To enable it you have to enable authentication with ENABLE_AUTH and
set AUTH_TYPE to jwt, then configure the settings you can see below.
| Variable | Description | Example |
|---|---|---|
JWT_APP_ID | Application identifier | my_jitsi_app_id |
JWT_APP_SECRET | Application secret known only to your token | my_jitsi_app_secret |
JWT_ACCEPTED_ISSUERS | (Optional) Set asap_accepted_issuers as a comma separated list | my_web_client,my_app_client |
JWT_ACCEPTED_AUDIENCES | (Optional) Set asap_accepted_audiences as a comma separated list | my_server1,my_server2 |
JWT_ASAP_KEYSERVER | (Optional) Set asap_keyserver to a url where public keys can be found | https://example.com/asap> |
JWT_ALLOW_EMPTY | (Optional) Allow anonymous users with no JWT while validating JWTs when provided | 0 |
JWT_AUTH_TYPE | (Optional) Controls which module is used for processing incoming JWTs | token |
JWT_TOKEN_AUTH_MODULE | (Optional) Controls which module is used for validating JWTs | token_verification |
This can be tested using the jwt.io debugger. Use the following sample payload:
{
  "context": {
    "user": {
      "avatar": "https://robohash.org/john-doe",
      "name": "John Doe",
      "email": "jdoe@example.com"
    }
  },
  "aud": "my_jitsi_app_id",
  "iss": "my_jitsi_app_id",
  "sub": "meet.jitsi",
  "room": "*"
}
Authentication using Matrix
For more information see the documentation of the "Prosody Auth Matrix User Verification" here.
| Variable | Description | Example |
|---|---|---|
MATRIX_UVS_URL | Base URL to the matrix user verification service (without ending slash) | https://uvs.example.com:3000 |
MATRIX_UVS_ISSUER | (optional) The issuer of the auth token to be passed through. Must match what is being set as iss in the JWT. | issuer (default) |
MATRIX_UVS_AUTH_TOKEN | (optional) user verification service auth token, if authentication enabled | changeme |
MATRIX_UVS_SYNC_POWER_LEVELS | (optional) Make Matrix room moderators owners of the Prosody room. | 1 |
Authentication using Hybrid Matrix Token
You can use Hybrid Matrix Token to authenticate users. It supports Matrix and JWT Token authentications
on the same setup. To enable it you have to enable authentication with ENABLE_AUTH and set AUTH_TYPE to
hybrid_matrix_token, then configure the settings you can see below.
For more information see the documentation of the "Hybrid Matrix Token" here.
| Variable | Description | Example |
|---|---|---|
MATRIX_UVS_URL | Base URL to the matrix user verification service (without ending slash) | https://uvs.example.com:3000 |
MATRIX_UVS_ISSUER | (optional) The issuer of the auth token to be passed through. Must match what is being set as iss in the JWT. It allows all issuers (*) by default. | my_issuer |
MATRIX_UVS_AUTH_TOKEN | (optional) user verification service auth token, if authentication enabled | my_matrix_secret |
MATRIX_UVS_SYNC_POWER_LEVELS | (optional) Make Matrix room moderators owners of the Prosody room. | 1 |
MATRIX_LOBBY_BYPASS | (optional) Allow Matrix room members to bypass Jitsi lobby check. | 1 |
JWT_APP_ID | Application identifier | my_jitsi_app_id |
JWT_APP_SECRET | Application secret known only to your token | my_jitsi_app_secret |
JWT_ALLOW_EMPTY | (Optional) Allow anonymous users with no JWT while validating JWTs when provided | 0 |
External authentication
| Variable | Description | Example |
|---|---|---|
TOKEN_AUTH_URL | Authenticate using external service or just focus external auth window if there is one already. | https://auth.meet.example.com/{room}> |
Shared document editing using Etherpad
You can collaboratively edit a document via Etherpad. In order to enable it, set the config options below and run
Docker Compose with the additional config file etherpad.yml.
Here are the required options:
| Variable | Description | Example |
|---|---|---|
ETHERPAD_URL_BASE | Set etherpad-lite URL | http://etherpad.meet.jitsi:9001 |
Virtual collaborative whiteboard using Excalidraw
You can use a virtual collaborative whiteboard via Excalidraw. In order to enable set WHITEBOARD_ENABLED and run
Docker Compose with the additional config file whiteboard.yml.
Here are the required options:
| Variable | Description | Default value |
|---|---|---|
WHITEBOARD_ENABLED | Enable whiteboard addon | false |
These options are also available
| Variable | Description | Example |
|---|---|---|
WHITEBOARD_COLLAB_SERVER_PUBLIC_URL | Set whiteboard URL | http://whiteboard.meet.jitsi:3000 |
Transcription configuration
If you want to enable the Transcribing function, set the config options below and run Docker Compose with the additional config file transcriber.yml.
| Variable | Description | Example |
|---|---|---|
ENABLE_TRANSCRIPTIONS | Enable Jigasi transcription in a conference | 1 |
In addition, the following are options are used to configure the various transcription backends and features:
| Variable | Description | Default |
|---|---|---|
GC_PROJECT_ID | project_id from Google Cloud Credentials | |
GC_PRIVATE_KEY_ID | private_key_id from Google Cloud Credentials | |
GC_PRIVATE_KEY | private_key from Google Cloud Credentials | |
GC_CLIENT_EMAIL | client_email from Google Cloud Credentials | |
GC_CLIENT_ID | client_id from Google Cloud Credentials | |
GC_CLIENT_CERT_URL | client_x509_cert_url from Google Cloud Credentials | |
JIGASI_TRANSCRIBER_ADVERTISE_URL | Jigasi will post an url to the chat with transcription file | true |
JIGASI_TRANSCRIBER_CUSTOM_SERVICE | Jigasi will use this class for custom transcriptions instead of google cloud | |
JIGASI_TRANSCRIBER_CUSTOM_TRANSLATION_SERVICE | Jigasi will use this class for custom transctions instead of google cloud | |
JIGASI_TRANSCRIBER_ENABLE_SAVING | Jigasi will save results to a transcription file | true |
JIGASI_TRANSCRIBER_FILTER_SILENCE | Jigasi will filter silent audio and not forward to backends | |
JIGASI_TRANSCRIBER_LIBRETRANSLATE_URL | URL for libretranslate services | |
JIGASI_TRANSCRIBER_OCI_COMPARTMENT | OCI compartment for use with Oracle Cloud Speech AI services | |
JIGASI_TRANSCRIBER_OCI_REGION | OCI region name for use with Oracle Cloud Speech AI services | |
JIGASI_TRANSCRIBER_RECORD_AUDIO | Jigasi will record audio when transcriber is on | true |
JIGASI_TRANSCRIBER_REMOTE_CONFIG_URL | URL to control transcriber custom service based on conference details | |
JIGASI_TRANSCRIBER_SEND_TXT | Jigasi will send transcribed text to the chat when transcriber is on | true |
JIGASI_TRANSCRIBER_USER | Jigasi XMPP user | |
JIGASI_TRANSCRIBER_VOSK_URL | URL for use with vosk backend | |
JIGASI_TRANSCRIBER_WHISPER_URL | URL for use with whisper backend | |
JIGASI_TRANSCRIBER_WHISPER_PRIVATE_KEY_NAME | Private Key ID of the private key to use with whisper | |
JIGASI_TRANSCRIBER_WHISPER_PRIVATE_KEY | Private Key material to use with whisper, without newlines or START/END delimiters |
For setting the Google Cloud Credentials please read https://cloud.google.com/text-to-speech/docs/quickstart-protocol > section "Before you begin" paragraph 1 to 5.
Sentry logging configuration
| Variable | Description | Default value |
|---|---|---|
JVB_SENTRY_DSN | Sentry Data Source Name (Endpoint for Sentry project) | https://public:private@host:port/1 |
JICOFO_SENTRY_DSN | Sentry Data Source Name (Endpoint for Sentry project) | https://public:private@host:port/1 |
JIGASI_SENTRY_DSN | Sentry Data Source Name (Endpoint for Sentry project) | https://public:private@host:port/1 |
SENTRY_ENVIRONMENT | Optional environment info to filter events | production |
SENTRY_RELEASE | Optional release info to filter events | 1.0.0 |
TURN server configuration
Configure external TURN servers.
| Variable | Description | Default value |
|---|---|---|
TURN_CREDENTIALS | Credentials for TURN servers | |
TURN_HOST | TURN server hostnames as a comma separated list (UDP or TCP transport) | |
TURN_PORT | TURN server port (UDP or TCP transport) | 443 |
TURN_TRANSPORT | TURN server protocols as a comma separated list (UDP or TCP or both) | tcp |
TURNS_HOST | TURN server hostnames as a comma separated list (TLS transport) | |
TURNS_PORT | TURN server port (TLS transport) | 443 |
TURN_TLL | TURN max allocation duration (sec) | 86400 |
Advanced configuration
These configuration options are already set and generally don't need to be changed.
| Variable | Description | Default value |
|---|---|---|
XMPP_DOMAIN | Internal XMPP domain | meet.jitsi |
XMPP_AUTH_DOMAIN | Internal XMPP domain for authenticated services | auth.meet.jitsi |
XMPP_SERVER | Internal XMPP server name xmpp.meet.jitsi | xmpp.meet.jitsi |
XMPP_BOSH_URL_BASE | Internal XMPP server URL for BOSH module | http://xmpp.meet.jitsi:5280 |
XMPP_MUC_DOMAIN | XMPP domain for the MUC | muc.meet.jitsi |
XMPP_INTERNAL_MUC_DOMAIN | XMPP domain for the internal MUC | internal-muc.meet.jitsi |
XMPP_GUEST_DOMAIN | XMPP domain for unauthenticated users | guest.meet.jitsi |
XMPP_RECORDER_DOMAIN | Domain for the jibri recorder | recorder.meet.jitsi |
XMPP_MODULES | Custom Prosody modules for XMPP_DOMAIN (comma separated) | info,alert |
XMPP_MUC_MODULES | Custom Prosody modules for MUC component (comma separated) | info,alert |
XMPP_INTERNAL_MUC_MODULES | Custom Prosody modules for internal MUC component (comma separated) | info,alert |
GLOBAL_MODULES | Custom prosody modules to load in global configuration (comma separated) | statistics,alert |
GLOBAL_CONFIG | Custom configuration string with escaped newlines | foo = bar;\nkey = val; |
RESTART_POLICY | Container restart policy | defaults to unless-stopped |
DISABLE_HTTPS | Handle TLS connections outside of this setup | 0 |
ENABLE_HTTP_REDIRECT | Redirect HTTP traffic to HTTPS | 0 |
LOG_LEVEL | Controls which logs are output from prosody and associated modules | info |
ENABLE_HSTS | Send a strict-transport-security header to force browsers to use a secure and trusted connection. Recommended for production use. | 1 |
ENABLE_IPV6 | Provides means to disable IPv6 in environments that don't support it | 1 |
ENABLE_COLIBRI_WEBSOCKET_UNSAFE_REGEX | Enabled older unsafe regex for JVB colibri-ws URLs. WARNING: Enable with caution, this regex allows connections to arbitrary internal IP addresses and is not recommended for production use. Unsafe regex is defined as [a-zA-Z0-9-\._]+ | 0 |
COLIBRI_WEBSOCKET_JVB_LOOKUP_NAME | DNS name to look up JVB IP address, used for default value of COLIBRI_WEBSOCKET_REGEX | jvb |
COLIBRI_WEBSOCKET_REGEX | Overrides the colibri regex used for proxying to JVB. Recommended to override in production with values matching possible JVB IP ranges | defaults to dig $COLIBRI_WEBSOCKET_JVB_LOOKUP_NAME unless DISABLE_COLIBRI_WEBSOCKET_JVB_LOOKUP is set to true |
DISABLE_COLIBRI_WEBSOCKET_JVB_LOOKUP | Controls whether to run dig $COLIBRI_WEBSOCKET_JVB_LOOKUP_NAME when defining COLIBRI_WEBSOCKET_REGEX | 0 |
Advanced Prosody options
| Variable | Description | Default value |
|---|---|---|
PROSODY_RESERVATION_ENABLED | Enable Prosody's reservation REST API | false |
PROSODY_RESERVATION_REST_BASE_URL | Base URL of Prosody's reservation REST API | |
PROSODY_AUTH_TYPE | Select authentication type for Prosody (internal, jwt or ldap) | AUTH_TYPE |
PROSODY_ENABLE_METRICS | Enables the http_openmetrics module which exposes Prometheus metrics at /metrics | false |
PROSODY_METRICS_ALLOWED_CIDR | CIDR block permitted to access metrics | 172.16.0.0/12 |
Advanced Jicofo options
| Variable | Description | Default value |
|---|---|---|
JICOFO_COMPONENT_SECRET | XMPP component password for Jicofo | s3cr37 |
JICOFO_AUTH_USER | XMPP user for Jicofo client connections | focus |
JICOFO_AUTH_PASSWORD | XMPP password for Jicofo client connections | <unset> |
JICOFO_ENABLE_AUTH | Enable authentication in Jicofo | ENABLE_AUTH |
JICOFO_AUTH_TYPE | Select authentication type for Jicofo (internal, jwt or ldap) | AUTH_TYPE |
JICOFO_AUTH_LIFETIME | Select session timeout value for an authenticated user | 24 hours |
JICOFO_ENABLE_HEALTH_CHECKS | Enable health checks inside Jicofo, allowing the use of the REST api to check Jicofo's status | false |
Advanced JVB options
| Variable | Description | Default value |
|---|---|---|
JVB_AUTH_USER | XMPP user for JVB MUC client connections | jvb |
JVB_AUTH_PASSWORD | XMPP password for JVB MUC client connections | <unset> |
JVB_STUN_SERVERS | STUN servers used to discover the server's public IP | stun.l.google.com:19302, stun1.l.google.com:19302, stun2.l.google.com:19302 |
JVB_PORT | UDP port for media used by Jitsi Videobridge | 10000 |
JVB_COLIBRI_PORT | COLIBRI REST API port of JVB exposed to localhost | 8080 |
JVB_BREWERY_MUC | MUC name for the JVB pool | jvbbrewery |
COLIBRI_REST_ENABLED | Enable the COLIBRI REST API | true |
SHUTDOWN_REST_ENABLED | Enable the shutdown REST API | true |
Advanced Jigasi options
| Variable | Description | Default value |
|---|---|---|
JIGASI_ENABLE_SDES_SRTP | Enable SDES srtp | 0 |
JIGASI_SIP_KEEP_ALIVE_METHOD | Keepalive method | OPTIONS |
JIGASI_HEALTH_CHECK_SIP_URI | Health-check extension | |
JIGASI_HEALTH_CHECK_INTERVAL | Health-check interval | 300000 |
JIGASI_XMPP_USER | XMPP user for Jigasi MUC client connections | jigasi |
JIGASI_XMPP_PASSWORD | XMPP password for Jigasi MUC client connections | <unset> |
JIGASI_BREWERY_MUC | MUC name for the Jigasi pool | jigasibrewery |
JIGASI_PORT_MIN | Minimum port for media used by Jigasi | 20000 |
JIGASI_PORT_MAX | Maximum port for media used by Jigasi | 20050 |
Running behind NAT or on a LAN environment
When running running in a LAN environment, or on the public Internet via NAT, the JVB_ADVERTISE_IPS env variable should be set.
This variable allows to control which IP addresses and ports the JVB will advertise for WebRTC media traffic. It is necessary to set it regardless of the use of a reverse proxy, since it's the IP address that will receive the media (audio / video) and not HTTP traffic, hence it's oblivious to the reverse proxy.
This variable used to be called DOCKER_HOST_ADDRESS but it got renamed for clarity and to support a list of IPs.
If your users are coming in over the Internet (and not over LAN), this will likely be your public IP address. If this is not set up correctly, calls will crash when more than two users join a meeting.
The public IP address is attempted to be discovered via STUN.
STUN servers can be specified with the JVB_STUN_SERVERS option.
Due to a bug in the docker version currently in the Debian repos (20.10.5), Docker does not listen on IPv6 ports, so for that combination you will have to manually obtain the latest version.
Split horizon
If you are running in a split horizon environemt (LAN internal clients connect to a local IP and other clients connect to a public IP) you can specify multiple advertised IPs by separating them with commas:
JVB_ADVERTISE_IPS=192.168.1.1,1.2.3.4
Advertising Ports
If your external port differs from the internal JVB_PORT, you can specify the advertised port along with the advertised IP:
JVB_ADVERTISE_IPS=192.168.1.1#12345,fe80::1#12345
Since IPv6 addresses use : in their representation, the # character is used to separate the IP from the port.
Offline / airgapped installation
If your setup does not have access to the Internet you'll need to disable STUN on the JVB since discovering its own IP address will fail, but that is not necessary on that type of environment.
JVB_DISABLE_STUN=true
Adjust UDP buffers
If you are experiencing issues with UDP traffic, like synchronization issues, skipping frames and similar, or if you expect a high traffic and big conferences, you might want to adjust the UDP buffer sizes.
You need to do that on the host system, that hosts the jvb container.
To do so you can get this sysctl config file and save it in /etc/sysctl.d and load it via: sysctl --system.
Accessing server logs
The default bahavior of docker-jitsi-meet is to log to stdout.
While the logs are sent to stdout, they are not lost: unless configured to drop all logs, Docker keeps them available for future retrieval and processing.
If you need to access the container's logs you have multiple options. Here are the main ones:
- run
docker compose logs -t -f <service_name>from command line, where<service_name>is one ofweb,prosody,jvb,jicofo. This command will output the logs for the selected service to stdout with timestamps. - use a standard docker logging driver to redirect the logs to the desired target (for instance
syslogorsplunk). - search docker hub for a third party docker logging driver plugin
- or write your own driver plugin if you have a very specific need.
For instance, if you want to have all logs related to a <service_name> written to /var/log/jitsi/<service_name> as json output, you could use docker-file-log-driver and configure it by adding the following block in your docker-compose.yml file, at the same level as the image block of the selected <service_name>:
services:
    <service_name>:
        image: ...
        ...
        logging:
            driver: file-log-driver
            options:
                fpath: "/jitsi/<service_name>.log"
If you want to only display the message part of the log in json format, simply execute the following command (for instance if fpath was set to /jitsi/jvb.log) which uses jq to extract the relevant part of the logs:
sudo cat /var/log/jitsi/jvb.log | jq -r '.msg' | jq -r '.message'
Build Instructions
Building your images allows you to edit the configuration files of each image individually, providing more customization for your deployment.
The docker images can be built by running the make command in the main repository folder. If you need to overwrite existing images from the remote source, use FORCE_REBUILD=1 make.
If you are on the unstable branch, build the images with FORCE_REBUILD=1 JITSI_RELEASE=unstable make.
You are now able to run docker compose up as usual.
Running behind a reverse proxy
When running behing a reverse proxy from the same host, the communication between the proxy and Jitsi Meet is often in HTTP and not HTTPS since we generally don't have valid certificates for localhost.
Jitsi Meet does not currently work well when deployed in a subdirectory.
Disable HTTPS
HTTPS can be disabled in the Docker Compose configuration (since HTTPS will probably not work on localhost):
DISABLE_HTTPS=1
ENABLE_HTTP_REDIRECT=0
ENABLE_LETSENCRYPT=0
Do not expose the Jitsi Meet's ports publicly
By default, the HTTP_PORT and HTTPS_PORT are binding to any ip address, so are publicly open unless a firewall blocks them. When using a reverse proxy, this is not necessary. This can be changed by updating the web container's ports configuration:
            - '127.0.0.1:${HTTP_PORT}:80'
            - '127.0.0.1:${HTTPS_PORT}:443'
instead of
            - '${HTTP_PORT}:80'
            - '${HTTPS_PORT}:443'
Reverse proxy configuration
By default this setup is using WebSocket connections for 2 core components:
- Signalling (XMPP)
- Bridge channel (colibri)
Due to the hop-by-hop nature of WebSockets the reverse proxy must properly terminate and forward WebSocket connections. There 2 routes require such treatment:
/xmpp-websocket/colibri-ws
The other HTTP requests must be handled by the web container.
In the following configuration examples, http://localhost:8000/ is the url of the web service's ingress (8000 corresponds to HTTP_PORT).
nginx
With nginx, these routes can be forwarded using the following config snippet:
location /xmpp-websocket {
    proxy_pass http://localhost:8000/xmpp-websocket;
    proxy_http_version 1.1;
    proxy_set_header Upgrade $http_upgrade;
    proxy_set_header Connection "upgrade";
}

location /colibri-ws {
    proxy_pass http://localhost:8000/colibri-ws;
    proxy_http_version 1.1;
    proxy_set_header Upgrade $http_upgrade;
    proxy_set_header Connection "upgrade";
}

location / {
    proxy_pass http://localhost:8000/;
    proxy_http_version 1.1;
}
Apache
With Apache, mod_proxy, mod_proxy_http and mod_proxy_wstunnel need to be enabled.
The reverse proxy can be configured using the following config snippet:
<IfModule mod_proxy.c>
    <IfModule mod_proxy_wstunnel.c>
        ProxyTimeout 900
        ProxyPass /xmpp-websocket ws://localhost:8000/xmpp-websocket
        ProxyPass /colibri-ws/ ws://localhost:8000/colibri-ws/
        ProxyPass / http://localhost:8000/
        ProxyPassReverse / http://localhost:8000/
    </IfModule>
</IfModule>
Disabling WebSocket connections
This is not the recommended setup.
If using WebSockets is not an option, these environment variables can be set to fallback to HTTP polling and WebRTC datachannels:
ENABLE_SCTP=1
ENABLE_COLIBRI_WEBSOCKET=0
ENABLE_XMPP_WEBSOCKET=0